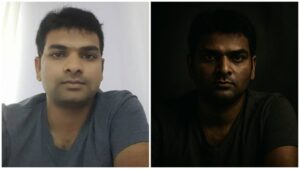
The power of a portrait lies not only in capturing a person’s face — but in telling a story through light, shadow, and silence. While bright, smiling selfies fill social media feeds, the moody portrait makes you pause, observe, and feel.
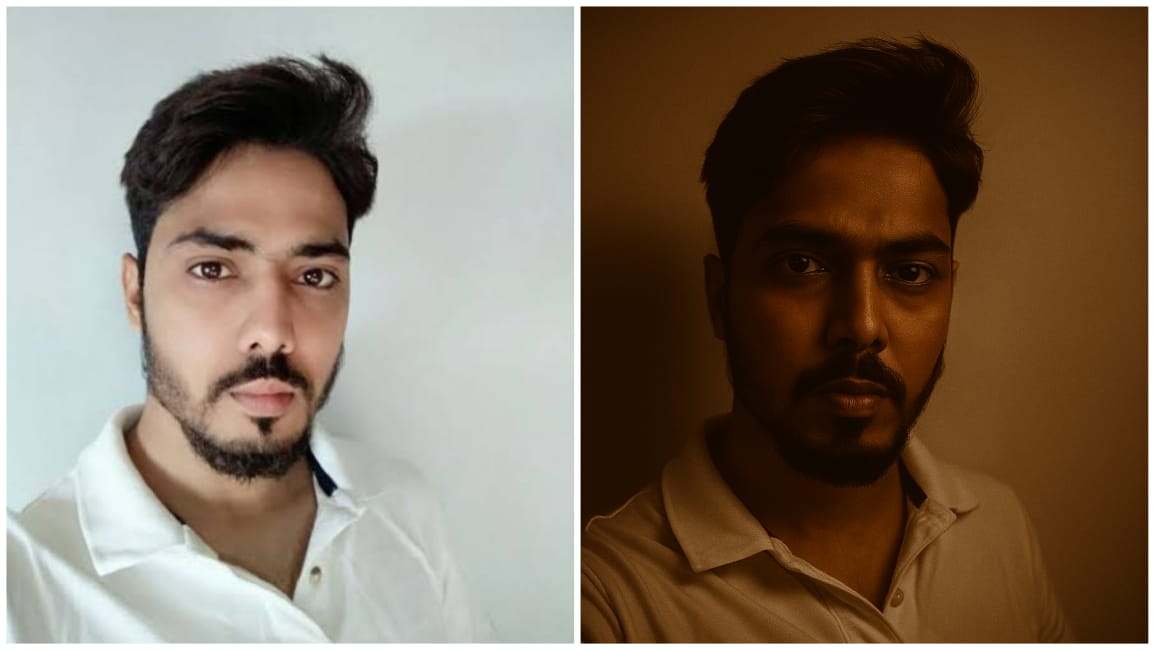
In this tutorial, you’ll learn how to generate a realistic moody portrait from a regular image using soft backlighting, dramatic wall shadow, a neutral expression, and smooth texture — all in the classic 4:3 aspect ratio. 🎞️
Whether you’re an artist, photographer, content creator, or AI art enthusiast, this is the perfect aesthetic to convey mystery, introspection, and cinematic depth.
🧠 Breakdown of the Prompt
Before editing or generating, let’s understand each part of the prompt:
| Element | Goal |
|---|---|
| Realistic moody portrait | Emphasize shadows, subdued tones, and drama |
| Soft backlighting | Glow from behind the subject to create halo effect |
| Face shadow falling on wall | Adds realism and direction to the light source |
| Neutral expression | No smiling or exaggerated emotions |
| Smooth texture | Gentle skin tone and even exposure |
| 4:3 composition | Classic portrait framing; tighter and elegant |
📸 What Is a Moody Portrait?
A moody portrait focuses on emotion through lighting and tonality — not necessarily facial expression. It usually includes:
- Deep shadows and soft light
- Subtle color palette (grays, browns, blues)
- Backlight or side light for drama
- Texture and grain that feels cinematic
- A quiet, powerful vibe
Think of movie posters, artistic photography, or album covers.
🧰 What You’ll Need
Tools (Choose any):
🖥️ For PC/Mac:
- Photoshop – Best for shadow/backlight control
- Lightroom – Great for tone grading and texture
- Luminar AI – AI-based moody portrait generator
- DaVinci Resolve (Free) – For dramatic LUTs and grading
- Topaz Studio – Enhance texture and realism
📱 Mobile Apps:
- Snapseed (iOS/Android) – Brush and curves tool
- Lightroom Mobile – Tone curves, clarity, and backlight
- Lensa AI – Easy mood enhancement
- Remini – For realistic texture upscaling
You can also use AI image tools like:
- DALL·E 3
- MidJourney
- Leonardo.Ai
- Runway ML (Gen-2) for video-style portraits
🖼️ Step-by-Step: How to Create the Moody Portrait
🎯 Step 1: Start With the Right Base Photo
Look for:
- A neutral or slightly thoughtful expression
- Face turned slightly sideways to help cast a shadow
- Plain background (wall or soft tone)
Avoid:
- Harsh frontal flash
- Busy background
- Over-smiling faces
If shooting yourself, stand near a wall with a dim natural light source behind or to the side.
💡 Step 2: Add Soft Backlighting
This is the emotional glow that defines moody portraits.
In Photoshop:
- Create a new layer.
- Use a large soft round brush (opacity 10–15%).
- Paint with a warm light color (pale yellow or amber) behind the subject’s head or shoulder.
- Add a Gaussian Blur (15–25px).
- Set blend mode to Screen or Soft Light.
In Lightroom:
- Use Radial Gradient behind the subject.
- Exposure: +0.3
- Temperature: +5
- Dehaze: -15 (for dreamy glow)
🧱 Step 3: Create the Shadow on the Wall
To make it realistic, you need the face’s shadow to appear softly behind on the wall, as if the light is behind the person.
Photoshop:
- Duplicate the subject layer.
- Flip it horizontally and skew it toward the wall using Transform Tool.
- Apply a Black Fill or drop the brightness to 0.
- Add Gaussian Blur (20–40px).
- Set layer opacity to 25–35%.
- Align it behind the original subject’s face for realism.
Snapseed:
- Use Brush Tool with exposure: -0.3
- Manually paint a faded shape of the head on the wall behind.
This technique gives an instant cinematic realism — light has direction, and the subject feels grounded in a scene.
😐 Step 4: Maintain a Neutral Expression
Avoid smiling or exaggerated emotion. Instead, the subject should:
- Look calm, blank, or slightly contemplative
- Eyes may gaze off-camera or directly at lens
- Avoid open mouth or wide-eyed looks
If you’re generating using AI, use prompts like:
- “neutral expression”
- “relaxed jaw, focused eyes”
- “no smile, cinematic calm”
🧴 Step 5: Smooth the Skin Texture (But Keep It Real)
Moody portraits don’t over-smooth. They preserve skin grain, reduce highlights, and maintain realism.
Lightroom Settings:
- Clarity: -10
- Texture: -15
- Shadows: +20
- Highlights: -30
Photoshop:
Use Frequency Separation or:
- Neural Filter > Skin Smoothing
- Smoothness: 35
- Shine Removal: ON
- Skin Tone Consistency: ON
Avoid overly glossy or beauty-mode filters. This isn’t a beauty ad — it’s about presence.
📐 Step 6: Crop to 4:3 Composition
4:3 is a classic portrait ratio used in film, magazines, and fine art.
Why 4:3?
- Not too narrow (like 9:16)
- Not too wide (like 16:9)
- Balanced for both vertical and horizontal emotion
Composition Tips:
- Center the face or align on left-third
- Leave breathing room above the head
- Ensure the shoulder line isn’t cropped awkwardly
How to crop in tools:
- Photoshop: Use Crop Tool > Set Ratio to 4:3
- Lightroom: Click Crop > Aspect > 4×3
🎨 Step 7: Add Final Moody Color Grade
Now bring out the emotional tones:
Lightroom:
- Temp: Slightly cool (5000–5200K)
- Tint: +5 magenta (for cinematic tone)
- Shadows: Add blue or green
- Highlights: Slight warm glow
Photoshop (LUTs or Gradient Map):
- Use LUTs like:
- “Teal and Orange Fade”
- “Muted Film”
- “Moody Kodak Gold”
OR
- Add a Gradient Map layer:
- Dark tones: Deep gray-blue
- Mid tones: Warm beige
- Highlights: Faded cream
- Blend Mode: Soft Light or Color
🎯 Final Adjustment:
- Add Grain: 10–15%
- Add slight Vignette
- Flatten highlights a bit more
Now you have the perfectly balanced mood portrait — emotionally rich, photo-realistic, and artistically dramatic.
🧪 Bonus: AI Prompt to Auto-Generate This Image
If you want to generate the image using an AI art tool like MidJourney, DALL·E, Leonardo, etc., use this prompt:
“A realistic cinematic moody portrait of a person with a neutral expression, soft backlighting creating glow around the hair and shoulders, face shadow cast softly on the wall behind, smooth skin texture, photographic detail, 4:3 composition, dim environment, soft film grain”
Add modifiers based on your needs:
- Male/Female
- Indoor/Outdoor wall
- Soft blue/amber tones
- Lens type (85mm, f1.8)
📍Where Can You Use This Portrait?
This moody portrait style is ideal for:
- 🎙️ Artist or musician press photos
- 🎥 Film posters or indie covers
- 📚 Author profile pictures
- 🧑🎤 Actor or performer headshots
- 🎧 Podcast thumbnails with emotion
- 🎭 Drama or theater profiles
- 🎞️ Personal branding with depth
🧼 Common Mistakes to Avoid
| Mistake | Solution |
|---|---|
| Harsh or neon backlight | Use soft glow, not spotlight |
| Flat expression | Use subtle intensity, not deadpan |
| Overdone texture smoothing | Balance clarity and realism |
| Cropping in wrong ratio | Stick to 4:3 for classic style |
| Missing wall shadow | Fake it using blur layers or AI tools |
✅ Final Look Checklist
| Element | Status |
|---|---|
| Neutral expression | ✅ |
| Soft backlighting | ✅ |
| Realistic wall shadow | ✅ |
| Moody color grade | ✅ |
| Smooth but real skin texture | ✅ |
| 4:3 Composition | ✅ |
✨ Conclusion: Let Shadows Tell the Story
A moody portrait isn’t about hiding emotion — it’s about expressing it without words. It’s about:
- Letting light reveal form
- Allowing shadows to shape mystery
- Capturing depth without distraction
With this guide, you now have everything you need to create or generate a photo that feels like fine art, looks cinematic, and leaves a lasting impression.