Whether you’re applying for a job, renewing your passport, creating a LinkedIn profile, or prepping for corporate branding, an ID-style headshot is often the first impression people will have of you. Unlike stylized portraits or creative selfies, ID-style headshots must follow a strict visual formula—clean, evenly lit, clear, and authentic.
This article focuses on how to convert a casual photo (or selfie) into a professional ID-style headshot, following this detailed prompt:
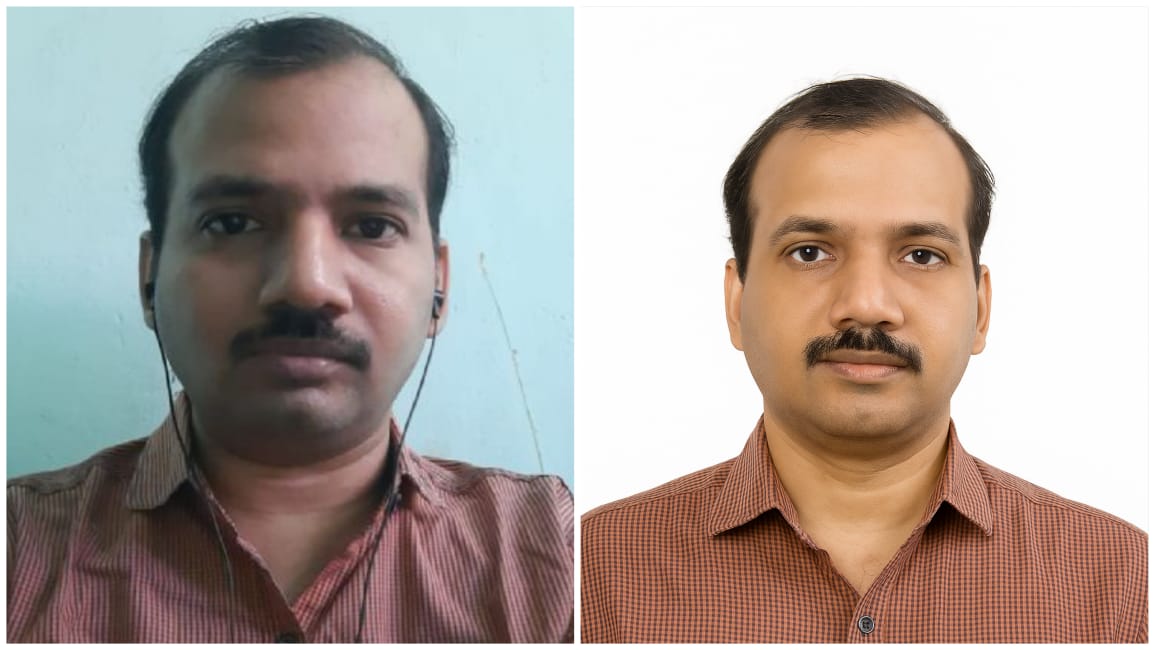
“Make a professional ID-style headshot. Use white background, match lighting from both sides, maintain original features, and preserve skin texture.”
We’ll walk you through:
- 📌 What makes a photo ID-compliant
- 🎯 The importance of lighting and background
- 🧠 Tools and techniques to simulate even lighting
- 🧼 Editing skin without over-smoothing
- 📤 Where and how to use your headshot
- ⚙️ Step-by-step transformation tutorial
- 🧑💻 SEO optimization tips for web display
1. What Is an ID-Style Headshot? 📇🖼️
An ID-style headshot is a photo typically used for:
- Passport or visa applications
- Work badges or employee directories
- LinkedIn profiles and professional bios
- Corporate pitch decks
- Official business or legal documentation
📋 The Standard Characteristics Include:
| Element | Requirement |
|---|---|
| Background | Pure white or light gray |
| Lighting | Symmetrical, soft, and balanced from both sides |
| Pose | Head straight, face forward, neutral expression |
| Editing | Natural skin tones, clear eyes, visible texture—no over-filtering |
2. Prompt Breakdown: What This Means 🎯
Let’s break down the prompt:
✅ “Make a professional ID-style headshot”
This means:
- Minimalism
- Symmetry
- No distractions
- A business-ready expression
✅ “Use white background”
The most common background in ID photos. It should be:
- Evenly lit
- No gradients or shadows
- Pure white (RGB: 255, 255, 255)
✅ “Match lighting from both sides”
Avoid shadows under the chin or on one side of the face. The light must be:
- Diffused
- Soft
- Evenly distributed
✅ “Maintain original features”
No distortion, reshaping, or heavy face modification. Authenticity is key.
✅ “Preserve skin texture”
The skin should look real, not plastic. Avoid aggressive smoothing or blur filters.
3. Why Professional Headshots Matter 👔📢
A polished headshot isn’t just for compliance—it’s about credibility and trust. A study by Princeton psychologists showed that people form first impressions within 1/10th of a second—often based on your face.
🧠 Your headshot communicates:
- Professionalism
- Confidence
- Cleanliness and clarity
- Visual brand identity
4. Tools to Create a Perfect ID-Style Headshot 🛠️📱
You don’t need a DSLR and softbox lighting. With today’s tools, you can turn any selfie into a pro-grade headshot.
🖥️ Desktop Tools
| Tool | Features Used |
|---|---|
| Photoshop | Background removal, lighting symmetry, skin retouch |
| Lightroom | Exposure matching, tone correction, texture enhancement |
| Luminar Neo | AI relighting, face enhancement |
| Fotor | Easy ID templates + AI skin touch-up |
📱 Mobile Apps
| App | Best For |
|---|---|
| Remini | Sharpening and clarity |
| Snapseed | Local brightness control |
| FaceApp Pro (light use) | Basic skin smoothing |
| IDPhotoStudio | Passport/ID formatting |
5. Step-by-Step: Transforming to ID-Style Headshot 📸✨
📷 Step 1: Choose the Right Base Photo
Start with:
- Front-facing selfie
- No tilt or head angle
- Neutral or slight smile
- Good facial visibility
🧼 Step 2: Clean the Background
Use:
- Photoshop’s Remove Background tool
- Or Remove.bg for fast AI cutout
- Then replace with pure white (
#FFFFFF) background
Avoid halo edges or shadows—soften transitions manually if needed.
💡 Step 3: Simulate Symmetrical Lighting
You can do this in multiple ways:
In Photoshop:
- Duplicate the image layer
- Flip it horizontally and apply low opacity
- Mask only the lighting part for side fill
Or use:
- Snapseed’s Selective tool to brighten shadowed areas
- Lightroom Brush to even out both sides of the face
🧽 Step 4: Preserve Skin Texture
Here’s how to clean skin without overdoing it:
- Use frequency separation (advanced) in Photoshop
- In apps like Remini, choose “Natural” mode only
- Use Texture slider in Lightroom to preserve pores
Never blur skin until it looks plastic—authentic texture is vital.
🧠 Step 5: Enhance Eyes and Hair
- Dodge tool (soft) to brighten eyes
- Add clarity to eyelashes and brows
- Keep hairline and flyaways visible but tidy
🖼️ Step 6: Crop and Frame
Crop using 4:5 or 1:1 ratio, depending on need:
- Forehead to shoulders visible
- Center the eyes in the top third
- Maintain equal white space on both sides
6. Exporting for Use 🗃️🔍
🔧 File Type:
- For printing: TIFF or high-quality JPEG
- For web: Optimized JPEG (85-90% quality)
🔢 Resolution:
- Minimum 300 dpi for print
- At least 600×800 pixels for digital use
📝 File Name:
Professional-ID-Headshot-[YourName].jpg
7. Common Mistakes to Avoid ❌🚫
| Mistake | Fix |
|---|---|
| Over-smoothing skin | Use low-opacity skin retouch tools |
| Inconsistent lighting | Balance both sides using light brush or AI filters |
| Messy background | Always replace with pure white |
| Poor cropping | Use ID-safe dimensions and maintain shoulder view |
| Filters or AR | Never use Snapchat/Instagram filters for professional headshots |
8. Where You Can Use This Headshot 🧑💼📍
- CV or resume
- Business cards
- Zoom profile
- Passport/visa documents
- Press kits or speaking events
- Personal brand websites
- Academic portfolios
A clean and credible ID-style photo opens doors to better perception, stronger networking, and real-world results.
9. SEO & Social Optimization Tips 🌐🔍
If uploading to a website, follow this checklist:
| Element | Example |
|---|---|
| Filename | id-headshot-malikhassan.jpg |
| Alt Text | “Professional ID headshot with white background and symmetrical lighting” |
| Title Tag | “Clean Headshot for Resume and LinkedIn” |
| Schema Markup | Person > image |
Add social tags if posting on personal portfolio sites:
og:imagetwitter:image
10. Sample Use Scenario 🎯
Scenario: Malik is applying for a tech job in Dubai and needs a professional-looking photo for both LinkedIn and his visa documents.
- He takes a selfie indoors with window light.
- Edits the background to pure white using remove.bg.
- Uses Snapseed to brighten one side and match both cheeks.
- Applies Remini to sharpen his facial texture.
- Crops to head-and-shoulders ratio.
- Saves a high-res and low-res version for different platforms.
👉 In 15–20 minutes, he has a headshot that looks studio-quality—without spending a rupee on a photo shoot!
Conclusion: Your Face, Your Brand 👤🌟
In a world where digital presence equals professional credibility, your headshot matters. But you don’t need a DSLR or a Hollywood studio to get a clean, confident, and compliant ID-style photo.
With the right tools and the right approach—guided by this simple prompt—you can:
- ✅ Match lighting like a pro
- ✅ Keep your authentic features intact
- ✅ Look credible and ready for opportunity
So go ahead—take that raw selfie, brighten it up, and show the world your best side. 💼📸✨