In the fast-paced digital world of 2025, visual identity matters more than ever. Whether it’s on your company’s “About Us” page, LinkedIn profile, speaker bio, or media kit — your photo is a first handshake, a silent pitch, and an essential personal branding asset.
But what if all you have is a normal, everyday photo?
No problem. This guide shows you exactly how to turn that casual snapshot into a premium corporate portrait using smart editing techniques — specifically:
“Apply high-resolution sharpening and slight contrast to create a premium corporate portrait from a normal photo. Keep original expression and clothes.”
This step-by-step article covers everything you need to:
- 🛠️ Upgrade clarity and professionalism
- 🔍 Preserve natural identity
- 🎯 Look sharp without over-editing
- 👔 Match a high-level corporate vibe
📷 1. What Is a Premium Corporate Portrait?
A premium corporate portrait isn’t just about luxury lighting or fancy gear. It’s about:
- Clarity (sharp focus, high resolution)
- Professional composition (balanced frame, strong posture)
- Tonal control (subtle contrast, realistic shadows)
- Personality preservation (natural expressions and attire)
Done right, it communicates trust, capability, and leadership — even if it started from a casual photo.
💡 2. Why Start from a Normal Photo?
You might wonder: why not just retake a new professional photo?
The reality:
- ✅ You might love your original expression
- ✅ You’re wearing suitable professional clothes
- ✅ It’s a real moment, not staged
- ✅ Reshoots take time, money, or studio access
So let’s make the best of what you already have — and elevate it with high-end editing.
🧠 3. Breakdown of the Prompt: What Needs to Be Done?
Let’s decode each part of this transformation prompt:
| Prompt Element | Action |
|---|---|
| High-resolution sharpening | Improve fine facial features, remove blur, enhance edges |
| Slight contrast | Add depth to facial contours, make clothing and hair pop |
| Premium corporate portrait | Final result should look business-ready |
| Keep original expression and clothes | No AI-face swap, no outfit change — keep authenticity |
The goal is to look like you were photographed by a high-end studio, without losing who you are.
🧰 4. Tools to Use (Free + Pro Options)
💻 Desktop Tools:
| Tool | Best For |
|---|---|
| Adobe Lightroom Classic | Professional sharpening, contrast control |
| Photoshop | Fine-tune details, crop and retouch |
| Luminar Neo | AI-based sharpening + skin-aware contrast |
| Fotor / Pixlr | Free options for light editing |
| ON1 Photo RAW | Realistic sharpening with noise control |
📱 Mobile Apps:
| App | Feature |
|---|---|
| Remini | One-tap high-res sharpening |
| Snapseed | Selective contrast + detail tools |
| Lightroom Mobile | Same power as desktop, compact UI |
| Lensa | Edge enhancement, subtle corrections |
📸 5. Choose the Right Starting Photo
Look for:
- A clear image with natural lighting
- Professional or semi-professional attire
- Neutral or soft background (no chaos behind you)
- A confident, natural expression (even if casual)
⚠️ Avoid:
- Pixelated selfies
- Heavy shadows or harsh lighting
- Backgrounds with logos, mess, or distractions
🪄 6. Step-by-Step Editing Process
🔧 Step 1: Increase Resolution (if needed)
If the original is low-res:
- Use Remini (mobile) or Photoshop’s Super Resolution
- Export to at least 2000px height for sharpness
📏 Ideal resolution: 2000 x 2500 px @ 300dpi
🎯 Step 2: Apply High-Resolution Sharpening
In Lightroom or Photoshop:
- Zoom into 100% view
- Use “Detail” panel (Lightroom):
- Sharpening: 30–45
- Radius: 0.8
- Detail: 25
- Masking: 80 (to protect skin)
OR
- Use “High Pass Filter” (Photoshop):
- Duplicate layer → Filter → Other → High Pass (set at 1.5–2.0 px)
- Set layer mode to Overlay
- Add mask to apply only to face and clothes
✅ Pro Tip: Avoid sharpening hair edges or background — it can look crunchy and fake.
🎨 Step 3: Add Slight Contrast (the Right Way)
Too much contrast = harsh, fake. Too little = flat and boring.
In Lightroom:
- Contrast: +10 to +15
- Whites: +10
- Blacks: -10
- Clarity: +5
- Texture: +10 (on clothes, not face)
In Snapseed (for mobile):
- Use “Tune Image”:
- Contrast: +15
- Ambiance: +10
- Shadows: -5
- Highlights: +5
✂️ Step 4: Frame Like a Corporate Photo
Crop for professionalism:
- Centered head and shoulders
- Collar clearly visible
- Leave breathing space above the head
- Aspect Ratio: 4:5 or square (1:1) for LinkedIn or websites
Avoid weird angles or selfie arms in frame.
🧼 Step 5: Final Cleanup (Optional)
✅ Remove:
- Minor blemishes
- Stray hair strands
- Dust on blazer, shirt, glasses
🧴 Keep:
- Smile lines
- Skin texture
- Eye wrinkles — they add maturity and confidence!
Use Spot Healing Tool (Photoshop) or “Healing” in Snapseed.
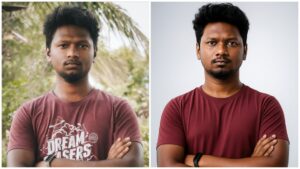
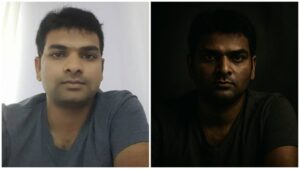
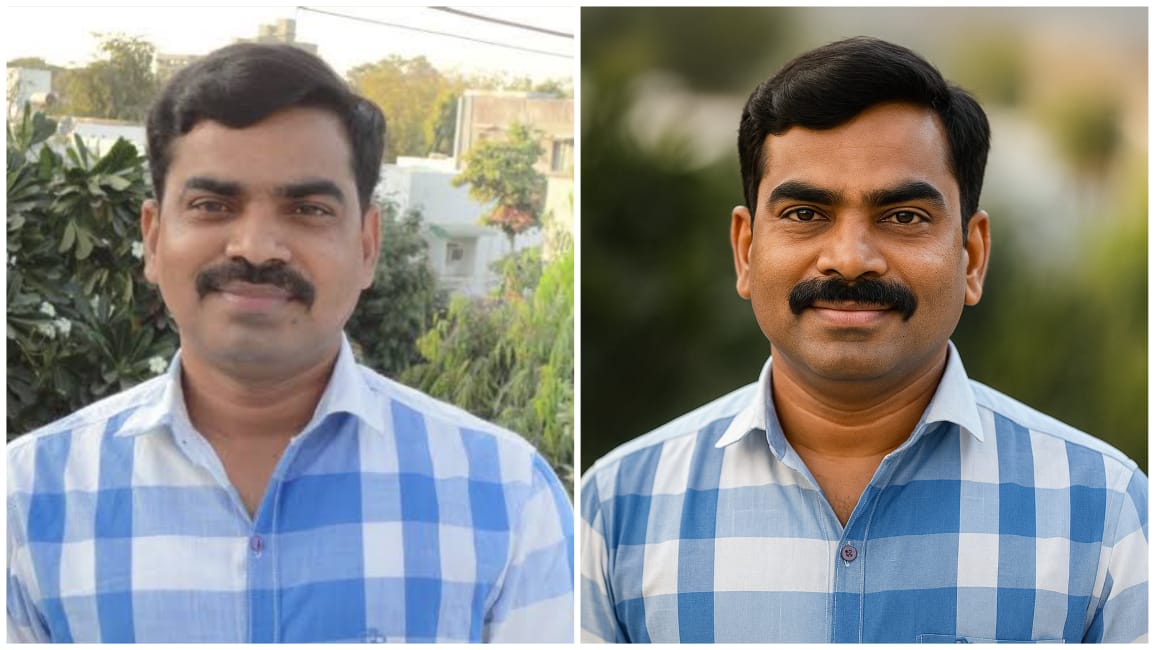
🔍 7. Before & After Checklist
| Feature | Before | After |
|---|---|---|
| Image Quality | Slightly soft | Sharper, high-res |
| Skin Texture | Flat or inconsistent | Even, realistic |
| Clothes | Dull | Defined texture and color |
| Expression | Natural | Preserved |
| Overall Look | Casual | Executive-level polish ✨ |
💼 8. Where to Use This Premium Portrait
Once your image is polished, share it everywhere that counts:
- 🔗 LinkedIn profile picture
- 🧑💼 Company website or staff directory
- 🗞️ Media kit or press articles
- 🧑🏫 Conference speaker bio
- 📧 Email signature (crop to square)
- 📱 Zoom, Teams, or Slack profile
Your portrait = your visual signature. Make it count.
❌ 9. Mistakes to Avoid
| Mistake | Fix |
|---|---|
| Over-sharpened image | Use masking to protect skin |
| Contrast too high | Limit to +15 and preview on mobile |
| Changing clothes digitally | Keep original to preserve authenticity |
| Expression edits | Never alter smiles or eye size |
| Over-smoothing skin | Preserve pores and wrinkles (adds trust) |
🎯 10. Pro Tips for Premium Vibe
- Use soft vignetting (light around edges) to draw attention to your face
- Export in WebP or high-quality JPEG
- Add light dodge on forehead, nose bridge, and chin (very subtle)
- If glasses reflect light, use Photoshop to reduce glare
- Sharpen eyelashes and eyes slightly more for depth
📁 11. SEO Tips for Personal Websites or Portfolios
If you’re uploading this portrait to your own site or digital CV:
| Field | SEO-Optimized Value |
|---|---|
| File Name | premium-corporate-headshot-MalikAhmad.jpg |
| Alt Text | “Corporate portrait of Malik Ahmad with professional attire and clean lighting” |
| Title | “Professional Executive Headshot” |
| Schema | Use Person type JSON-LD with "image" field |
Compress your image with TinyPNG or ImageOptim before uploading to improve site speed!
📌 Summary: From Casual to Corporate Like a Pro
Here’s what we’ve learned:
✅ You don’t need a DSLR or studio shoot
✅ You can elevate any decent photo with:
- High-resolution sharpening
- Balanced contrast
- Clean composition
- Natural expressions and clothes
A great corporate portrait isn’t about looking artificial — it’s about looking like the best version of your real self.